Charming: Charming Computing
The declarative data-driven language for creative coding and ASCII art with high performance. (2023.09 - Present)
Charming short for Charming Computing, is a free, open-source, creative coding language for computational art with high performance. It has a declarative, concise, yet expressive API inspired by G2.js, D3.js and P5.js.
The data-driven API style provides Charming with the potential for high performance, as it can take advantage of WebGL’s batch rendering technique: rendering hundreds to thousands of objects or elements with just a single draw call. At the same time, some GLSL functions can be defined to offload expensive calculations to the GPU, thereby significantly increasing the FPS. It may also implement a WebGPU renderer in the future to accomplish this more easily with Compute Shader.
In addition to high performance, Charming focuses on making ASCII art accessible for artists, designers, educators, beginners, and anyone else! It provided a consistent API for both styles, and the terminal canvas for ASCII art is embedded in JavaScript and uses a software rasterizer written in Rust compiled to WASM, to gain high-performance hopefully.
Moreover, Charming also puts a strong emphasis on lightweight: the core bundle is just 25kb minified. With that in mind, Charming is designed to be flexible, incrementally adoptable, and supports fully tree shaking. It also means that Charming is beginner friendly, because you don’t have to start by diving into complex concepts: think of it as a collection of syntactic sugars for Canvas API.
Most importantly, my hope with Charming is that you spend less time wrangling the machinery of programming and more time “using computing to tell stories”. Or put more simply: With Charming, you’ll express more, more easily.
Introduction
On my programming journey, two tools have shaped me: Processing and D3.js. The former makes coding fun, while the latter makes coding elegant. What about Charming? Let’s see…
As I began my journey into computational art, I found P5.js and Processing to be excellent starting points. Their artist-centered APIs really helped me get stuff drawn onto the screen quickly and easily, allowing me to focus on creative expression. I quickly published a series of artworks on OpenProcessing, instead of spending time wondering why the computer didn’t work as I expected before my time or patience ran out. Additionally, I also designed a creative coding language Charming.py with the same style of APIs, for ASCII art in the terminal.
However, when I became a front-end engineer in the field of visualization, I noticed a distinct shift in programming paradigms for both visualization grammars and front-end frameworks: from imperative to declarative. Declarative grammars can accelerate development, facilitate retargeting across platforms, and allow language-level optimizations. While P5.js, as the computational art framework for the web, is still imperative and I found myself using it less and less as I tasted the benefits of declarative programming. So I began to ponder whether it was possible to design and implement a declarative grammar specifically for computational art or creative coding?
On the contrary, D3.js is declarative, but it has performance issues when rendering frame animations. It is built on SVG, which excels at interactive visualizations but is less suited for animation-based computational art, owing to performance constraints. Although, in theory, D3.js can work with any rendering technology that implements the SVG standard, the complexity of the standard would inevitably introduce additional runtime overhead and increase the bundle size. P5.js also faces performance issues. Although it is based on Canvas, each graphic corresponds to an individual draw call, which increases the overhead between the CPU and GPU.
In addition to performance issues, P5.js and D3.js also do not support various artistic styles, which is a disappointment for me. This is grounded in the belief that creativity lies in changing the relationship between content and form, thereby shifting the user’s perception of information, as noted by John Maeda.
Furthermore, there are some common issues found in P5.js for advanced projects, such as namespace pollution, large bundle size, restrictions on API usage contexts, and additional overhead introduced by the Friendly Error System (FES). Based on these considerations, I have set the following goals for the new creative coding tool:
- Declarative. Declarative grammar decouples specification (the what) from execution (the how). This approach not only makes code more predictable but also diversifies the underlying rendering implementations.
- High Performance. Capable of rendering tens of thousands of graphics in real-time (60FPS).
- ASCII Art. Providing a consistent API to render both conventional visual arts and ASCII Art, allowing more people to see and create this art form from the last century, feeling the romance of programmers.
- Composable. Simple components gain power through composition. A suitable composition mechanism can enhance capabilities while maintaining a consistent API style and cohesive architecture.
- Lightweight. - Making the core bundle small and providing appropriate interfaces to expand features.
- Beginner Friendly. Beginners can create simple visual effects without learning complex concepts at first.
To address these concerns, I design and implement Charming, the declarative data-driven language for creative coding and ASCII art with high performance. With Charming, artists can easily bind shapes with data. It enables 2D primitives to utilize WebGL for improved performance instead of the conventional Canvas, and it allows shapes to be transformed into ASCII art by a terminal renderer, thereby broadening the spectrum of possible artistic expressions. Charming also incorporates best practices from P5.js and valuable parts from D3.js.
It is important to emphasize that Charming remains committed to P5.js’s core principle: to be beginner-friendly. Beyond keeping the APIs concise and intuitive, Charming will place a significant focus on teaching, recognizing it as the most influential facet of tool building.
Design
The global cm, also serving as a namespace, exports all the methods of Charming. A Charming sketch is called app, for rendering and animating shapes and handling events. Charming’s atomic operand is flow: a container holds data and shapes. Operators act on flow, modifying content. The data operators create flows and place data into them. The process operators pipe data through a series of pure functions to prepare data for rendering. The append operators add a new shape for each processed datum in this flow, extracting columns of data and assigning them to shape attributes. The transform operators derive and modify extracted shape attribute values before committing to the renderer. A WebGL renderer is provided for high performance graphics, and a terminal renderer is available specifically for ASCII Art. Functions with specific signatures are considered composite shapes and can be directly appended to the canvas. Several helper modules, such as vector and random, facilitate computational art authoring.
App
To prevent the global state issues found in P5.js, Charming, drawing inspiration from Canvas and most rendering engines, operates on an instance to draw graphics. In Charming, each instance is an app, created by cm.app with specified options, such as width and height.
Apps provide an on method to listen for events, including a repeatedly triggered update event for rendering animations, as well as a series of user input events for interaction. The reason for using update instead of draw as in P5.js for the per-frame callback name is more accurate: each frame not only renders graphics but also updates the data state. Each event can register multiple listeners, allowing different update logic to be placed in separate listeners, which better organizes the code.
The prop method is used to get various app properties and states, such as width, height, and mouse position. Sketches are rendered using the render method and updated through the start method. All the methods for app support method chaining for convince: the method return value is the app.
For example, to draw a circle following the mouse:
{
  const app = cm.app({
    width: 600,
    height: 200,
  });

  // Clears background, and
  // draws a circle at the mouse position,
  // defaults to center of the canvas.
  app
    .on("update", () => {
      app.append(cm.clear, { fill: "white" });
    })
    .on("update", () => {
      app.append(cm.circle, {
        x: app.prop("mouseX") || app.prop("width") / 2,
        y: app.prop("mouseY") || app.prop("height") / 2,
        r: 30,
        fill: "black",
      });
    });

  // Diposes app when rerunning cell.
  function dispose(app) {
    invalidation.then(() => app.dispose());
  }

  const node = app.start().call(dispose).call(frame).node();

  display(node);
}
Flow
The core of Charming is built on one observation in my two years of experience developing and maintaining the new 5.0 version of G2: visualization and generative art are both data-driven to some extent. The difference is that visualization(information visualization more specifically) is typically driven by data derived from daily life activities, while computational art is driven by data generated by algorithms or computing. The for loops in numerous generative art codes can prove this.
I also observed that in the visualization field, a complete drawing process includes three stages: data preprocessing, such as sorting, filtering, and unfolding; the encoding stage, where data is bound to graphics and graphic properties are linked to column data; and the transformation stage, where graphic properties are transformed into final visual attributes, such as mapping, stacking, and aggregation. Computational art follows similar stages, for instance, in simulating the physical world, attributes like velocity, acceleration, and position of objects are updated before drawing; then, the properties of objects, such as position, are associated with graphic attributes; finally, before drawing, some properties can undergo simple mapping.
Based on that, Charming introduces flow to link together the entire drawing process, inspired by selection in D3.js and monad in Functional Programming. Any number of operators can be applied to the current flow. To author computational art declaratively, flow also supports method chaining for brevity when applying multiple operators: the operator return value is a new flow, which allows a clear relationship between the raw data and the drawn graphics can be seen through the declared operators.
The data operator returns a new flow that contains this specified data. The app-level data operator is just sugar syntax for the root flow of the app. If the specified data is an array of arbitrary values(e.g. number of objects), sets [data] as the group of this flow. If the flow has multiple groups(such as flow.data followed by app.data ), then data should typically be specified as a function. The function will be evaluated for each group in order, passing the group’s parent datum(d), the group index(i), all the groups(data), and this flow(flow).
The process operator processes the data of this flow with the specified process function receiving the specified options, returning a flow with the processed data. It provides a convenient mechanism to manipulate data before calling flow.append to bind it with shapes.
The append operator appends and binds shapes with the data of this flow, returning a flow with shapes. Shapes are created by the specified shape function with the specified options. The shape function interprets attribute values and invokes the renderer of this flow to draw shapes. For each attribute, if the value is constant, all the shapes are given the same attribute value; if the value is an array of primitives(number, string, and boolean), assign each primitive to each shape in order; otherwise, if the value is a function, it is evaluated for each datum, in order, being passed the current datum(d), the current index(i), the data(data) and this flow(flow). The function’s return value is then used to set each shape’s attribute. It should be noted that the appended shapes are not immediately drawn onto the canvas, but are stored in an internal scene graph and rendered all at once in each frame.
The transform operator transforms shapes’ attribute values with the specified transform function receiving the specified options, returning a flow with the transformed attribute values. It provides a convenient mechanism to manipulate attribute values after calling flow.append to binding data with shapes. A typical transform operator in Charming is scale, which maps abstract attributes to visual attributes.
For example, to simulate some falling particles:
{
  const width = 600,
    height = 200,
    particles = [];

  function update(app) {
    // Appends clear shape to clear background.
    app.append(cm.clear, { fill: cm.rgb(255) });

    app
      .data(particles) // Creates flows and places data.
      .process(cm.push, create) // Updates particles' state.
      .process(cm.eachRight, remove)
      .process(cm.each, age)
      .process(cm.each, move)
      .append(cm.circle, {
        // Binds particles with circles.
        x: (d) => d.location.x,
        y: (d) => d.location.y,
        r: 5,
        fill: cm.rgb(0),
        stroke: cm.rgb(0),
        fillOpacity: (d) => d.lifespan,
        strokeOpacity: (d) => d.lifespan,
      })
      .transform(cm.mapAttrs, {
        // Map abstract values to visual values by scales.
        fillOpacity: { domain: [0, 255], range: [0, 0.6] },
        strokeOpacity: { domain: [0, 255], range: [0, 1] },
      });
  }

  function create(d, i, data, flow) {
    const app = flow.app();
    return {
      location: cm.vec(app.prop("width") / 2, 50),
      velocity: cm.vec(cm.random(-1, 1), cm.random(-2, 0)),
      acceleration: cm.vec(0, 0.05),
      lifespan: 255,
    };
  }

  function remove(d, i, array) {
    d.lifespan < 0 && array.splice(i, 1);
  }

  function age(d) {
    d.lifespan -= 2;
  }

  function move(d) {
    d.velocity.add(d.acceleration);
    d.location.add(d.velocity);
  }

  // Diposes app when rerunning cell.
  function dispose(app) {
    invalidation.then(() => app.dispose());
  }

  const node = cm.app({ width, height }).on("update", update).call(dispose).call(frame).start().node();

  display(node);
}
It’s noteworthy that flow allows users to organize logic in a functional programming style, rather than the object-oriented approach recommended by Processing or P5.js, making the code more concise and better organized.
WebGL Renderer
By reading Instanced WebGL Circles, I learned the method of efficiently rendering 2D graphics using WebGL: batch rendering.
Compared to traditional rendering technologies like Canvas, where each shape requires an individual draw call, WebGL’s batch rendering technique allows for the rendering of hundreds or even thousands of similar objects in a single draw call. This cuts down communication overhead between the CPU and GPU, thus enhancing rendering efficiency.
I noticed that batch rendering is particularly well-suited for computational art, as algorithms often generate a large number of similar graphics. Meanwhile, Charming’s flow operand is perfect for batch rendering, as it naturally groups similar objects together without introducing additional overhead. More importantly, by decoupling specification (the what) from execution (the how), Charming can use different renderers to render the scene tree generated by flow, making the implementation of a WebGL renderer possible.
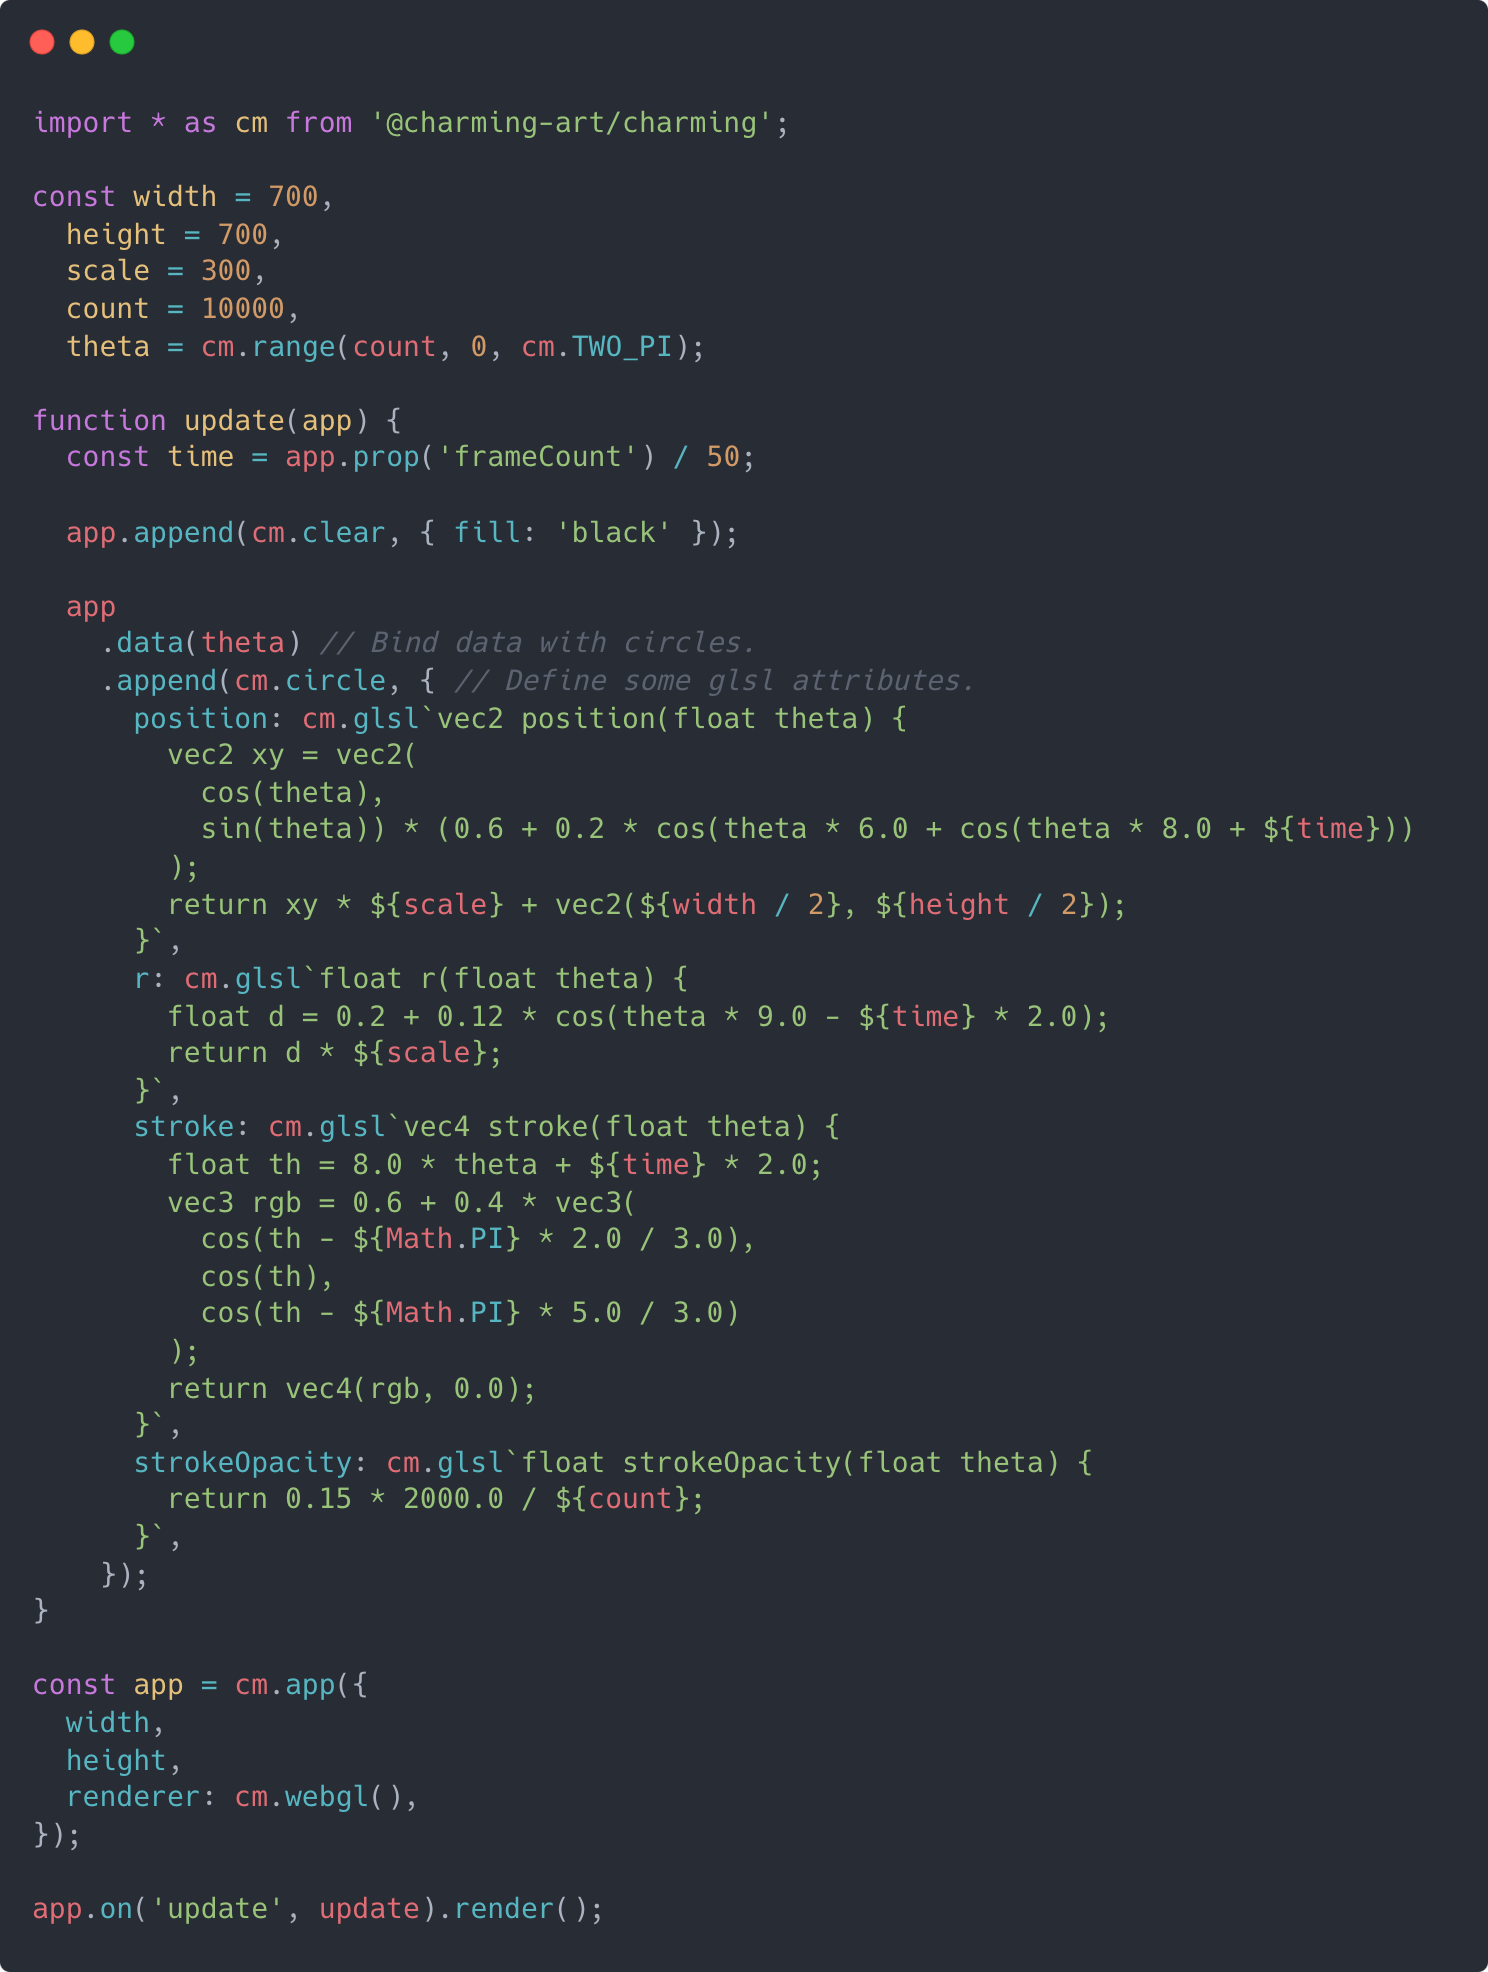
In addition to optimizing rendering, Charming further enhances performance by offloading expensive computations to the GPU, thereby optimizing calculation efficiency. GLSL functions can be conveniently defined using cm.glsl, a tagged template literal specifically for GLSL that supports the interpolation of dynamic and non-serializable JavaScript numbers. Each shape attribute ought to be encapsulated within a GLSL function that carries the name of the corresponding attribute. This function is invoked with each data item(d) held by the flow and is expected to return a value of the specified attribute type. Charming enables moving expensive computations into GLSL attributes, which are then compiled into shader programs, allowing the GPU to handle these operations efficiently.
Afterward, I reimplemented the effects in the article using Charming. On one hand, it enhanced the readability of the code, clearly showing how shape’ attributes are calculated; on the other, it simplified the implementation, eliminating the need to deal with the cumbersome initialization process of WebGL, and made parameter passing more intuitive and efficient through interpolation.
{
  const width = 700,
    height = 700,
    scale = 300,
    theta = cm.range(count, 0, cm.TWO_PI);

  function update(app) {
    const time = app.prop("frameCount") / 50;

    app.append(cm.clear, { fill: "black" });

    app
      .data(theta) // Bind Data.
      .append(cm.circle, {
        // Define some glsl attributes and interpolate some values.
        position: cm.glsl`vec2 position(float theta) {
          vec2 xy = vec2(
            cos(theta),
            sin(theta)) * (0.6 + 0.2 * cos(theta * 6.0 + cos(theta * 8.0 + ${time}))
          );
          return xy * ${scale} + vec2(${width / 2}, ${height / 2});
        }`,
        r: cm.glsl`float r(float theta) {
          float d = 0.2 + 0.12 * cos(theta * 9.0 - ${time} * 2.0);
          return d * ${scale};
        }`,
        stroke: cm.glsl`vec4 stroke(float theta) {
          float th = 8.0 * theta + ${time} * 2.0;
          vec3 rgb = 0.6 + 0.4 * vec3(
            cos(th - ${Math.PI} * 2.0 / 3.0),
            cos(th),
            cos(th - ${Math.PI} * 5.0 / 3.0)
          );
          return vec4(rgb, 0.0);
        }`,
        strokeOpacity: cm.glsl`float strokeOpacity(float theta) {
          return 0.15 * 2000.0 / ${count};
        }`,
      });
  }

  // Diposes app when rerunning cell.
  function dispose(app) {
    invalidation.then(() => app.dispose());
  }

  const node = cm
    .app({
      width,
      height,
      renderer: cm.webgl(), // Uses WebGL renderer.
    })
    .on("update", update)
    .call(stats)
    .call(dispose)
    .start()
    .node();

  display(node);
}
I also discovered that GLSL functions are well-suited for Shader Art: the fill attribute of a rect shape can serve as the code for a fragment shader. To verify this, I implemented an example from Shader Toy:
{
  const width = 640;
  const height = 360;
  const palette = cm.glsl`vec3 palette(float t) {
    vec3 a = vec3(0.5, 0.5, 0.5);
    vec3 b = vec3(0.5, 0.5, 0.5);
    vec3 c = vec3(1.0, 1.0, 1.0);
    vec3 d = vec3(0.263, 0.416, 0.557);
    return a + b * cos(3.1415926 * 2.0 * (c * t + d));
  }`;

  function update(app) {
    const time = app.prop("frameCount") / 50;
    const fill = cm.glsl`vec4 fill(vec2 coord, vec4 color) {
      vec2 uv = (coord - vec2(${width}, ${height})) / ${height};
      vec2 uv0 = uv;
      vec3 rgb = vec3(0.0);
      for (float i = 0.0; i < 4.0; i++) {
        uv = fract(uv * 1.5) - 0.5;
        float d = length(uv) * exp(-length(uv0));
        vec3 col = ${palette}(length(uv0) + i * 0.4 + ${time} * 0.4);
        d = sin(d * 8.0 + ${time}) / 8.0;
        d = abs(d);
        d = pow(0.01 / d, 1.2);
        rgb += col * d;
      }
      return vec4(rgb, 1.0);
    }`;
    app.append(cm.rect, { x: 0, y: 0, width, height, fill });
  }

  // Diposes app when rerunning cell.
  function dispose(app) {
    invalidation.then(() => app.dispose());
  }

  const node = cm
    .app({
      renderer: cm.webgl(), // Uses WebGL renderer.
      width,
      height,
    })
    .on("update", update)
    .call(dispose)
    .start()
    .node();

  display(node);
}
Terminal Renderer
After exploring asciimatics, I became interested in ASCII art, as I found it to be a reflection of the old-school romance of programmers. To make this art form more accessible, I designed Charming.py: a language based on Python for creating ASCII art, inspired by Processing. However, I realized that basing on the local terminal was not conducive to dissemination, and Python had some performance issues, so the project was put on hold.
I also found that the difference between ASCII art and regular art is not significant, mainly in two aspects:
- Different coordinate systems: ASCII art uses cells instead of pixels.
- Different color composition: In ASCII art, each unit has a background color, a character, and the color of the character.
Based on these considerations, Charming introduces the terminal renderer, mocking a terminal on the web and using a software rasterizer written in Rust compiled to WASM, to gain high performance hopefully.
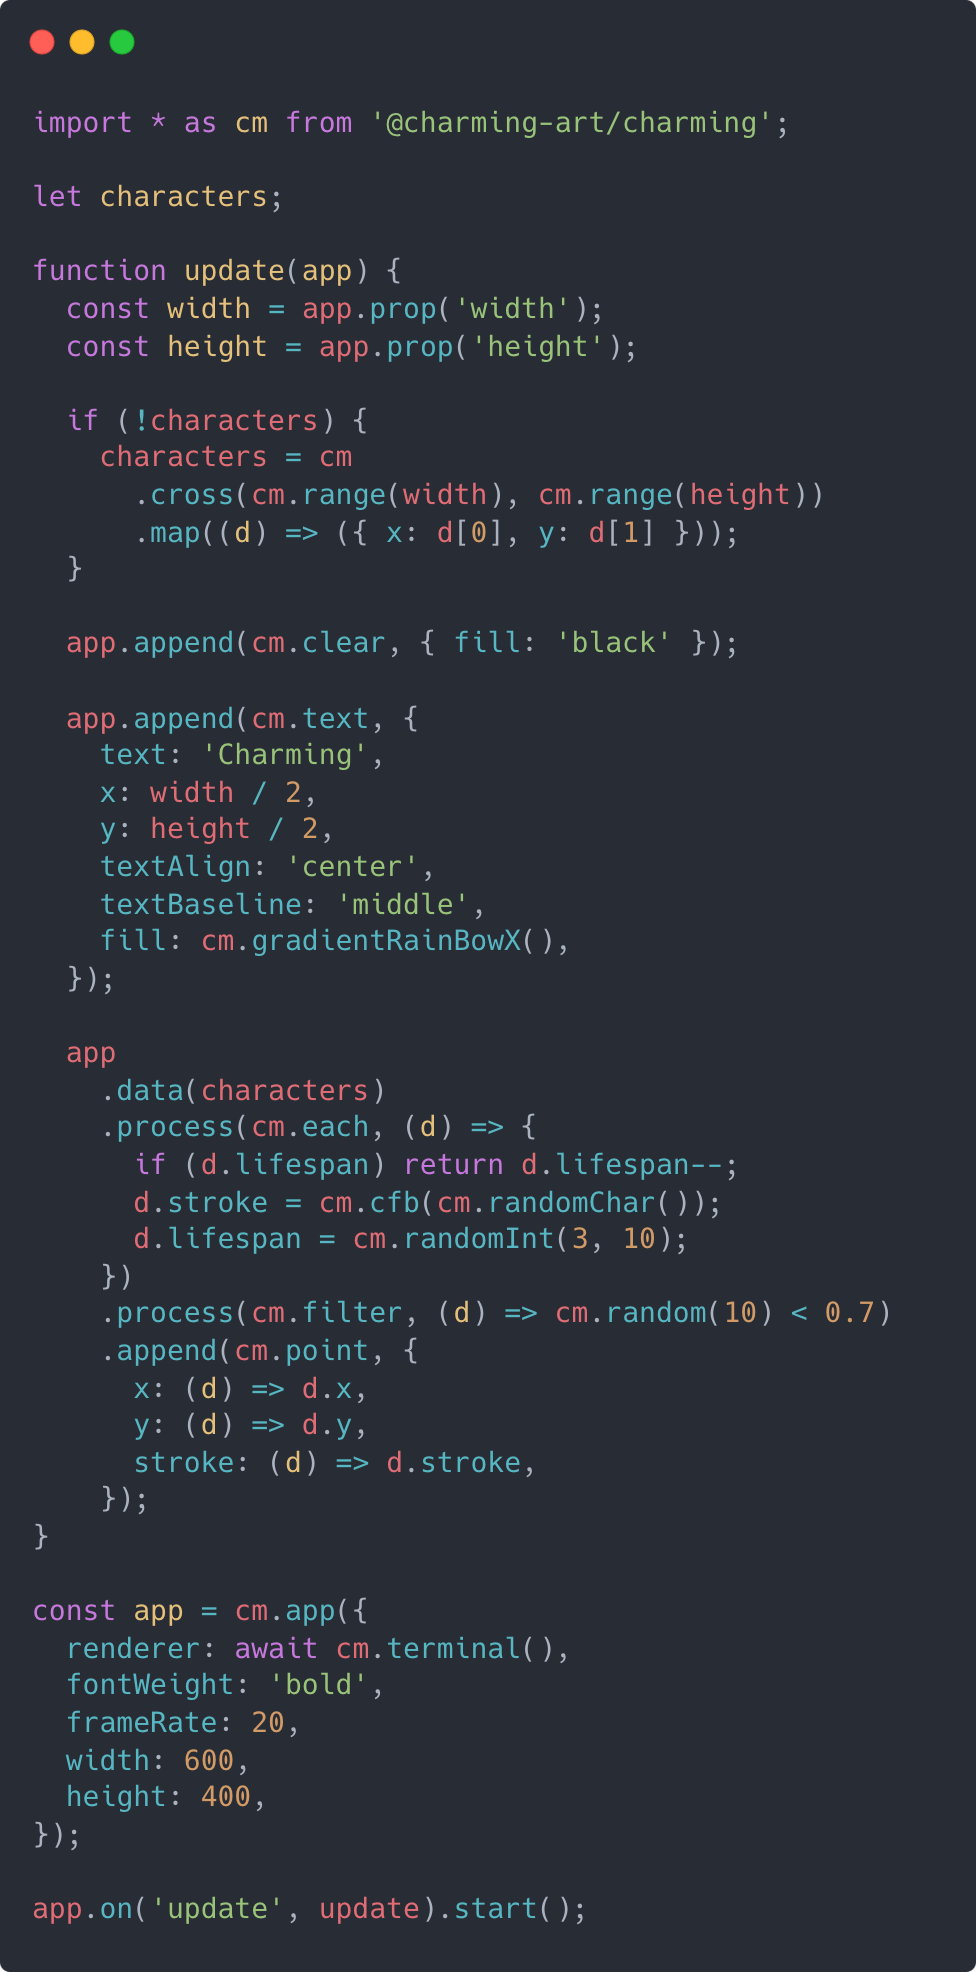
Terminal renderer enables users to create ASCII art as effortlessly as they would with traditional art forms. Instead of using pixels, this renderer takes a unique approach by shifting the coordinate system from pixels to cells, allowing shapes to be rendered into printable characters and emojis. Each “cell” in the ASCII art can be defined by a character (ch), with a foreground color (fg) and background color (bg), vastly enhancing the expressive potential compared to the traditional color encoding methods.
For example, to draw text in the style of ASCII art and render points into random characters to simulate character matrix effect:
{
  let strings = null;

  function update(app) {
    const width = app.prop("width");
    const height = app.prop("height");
    if (!strings) strings = cm.range(width).map(() => createString(height));

    app.append(cm.clear, { fill: "black" });

    app
      .data(strings)
      .process(cm.eachRight, updateString)
      .append(cm.group, {
        x: (_, i) => i,
        y: (d) => d.y,
      })
      .data((d) => d.chars)
      .append(cm.point, {
        x: 0,
        y: (_, i) => i,
        stroke: (d) => cm.cfb(d, "#6EBD41"),
      });
  }

  function createString(height) {
    const lifespan = cm.randomInt(height);
    const length = cm.randomInt(lifespan);
    const chars = cm.range(length).map(cm.randomChar);
    const y = cm.randomInt(0, 15);
    return { lifespan, length, chars, y };
  }

  function updateString(d, i, array, flow) {
    const app = flow.app();
    const height = app.prop("height");
    const { chars, lifespan, length } = array[i];
    const curLength = chars.length;

    // Create a new string if the current one is dead.
    // Fade out the string if lifespan is less than the current length.
    // Fade in the string if lifespan is greater than the current length.
    if (lifespan < 0) array[i] = createString(height);
    else if (lifespan <= curLength) chars[curLength - lifespan] = "";
    else if (lifespan > curLength) {
      for (let i = length - 1; i < curLength; i++) chars[i] = cm.randomChar();
      chars.push(cm.randomChar());
    }

    d.lifespan--;
  }

  // Diposes app when rerunning cell.
  function dispose(app) {
    invalidation.then(() => app.dispose());
  }

  const app = cm.app({
    renderer: await cm.terminal(), // Uses terminal renderer.
    frameRate: 15,
    fontWeight: "bold",
  });

  const node = app.on("update", update).call(dispose).start().node();

  display(node);
}
Composite Shape
Inspired by the component philosophy in React, Charming makes it easy to define custom composite shapes through pure function, being passed the current flow(flow), and the processed attribute values(options).
To reduce the cost of customization, by default, all properties of composite shapes are processed as arrays. Users can calculate the properties of new sub-shapes based on these array attributes. It is also possible to define some non-data-driven attributes by cm.constant to skip arrayization.
For example, to define a arrow shape:
function arrow(flow, { length, x, y, rotate, angle, ...options }) {
  const group = flow.append(cm.group, { x, y, rotate });
  const l1 = length.map((d) => d / 2);
  const l2 = length.map((d) => -d / 2);
  group.append(cm.link, { x: l2, y: 0, x1: l1, y1: 0, ...options });
  group.append(cm.link, {
    x: 0,
    y: 0,
    x1: l1,
    y1: 0,
    rotate: angle,
    transformOrigin: "end",
    ...options,
  });
  group.append(cm.link, {
    x: 0,
    y: 0,
    x1: l1,
    y1: 0,
    rotate: -angle,
    transformOrigin: "end",
    ...options,
  });
}
This composite shape can be used like any built-in shape, and supports transform operator as well.
For example, to draw a flow field:
{
  const width = 640,
    height = 240,
    size = 16,
    cols = width / size,
    rows = height / size,
    noise = cm.randomNoise(),
    fields = cm.cross(cm.range(cols), cm.range(rows)).map(([x, y]) => ({ x, y, value: noise(y * 0.1, x * 0.1) }));

  const app = cm.app({ width, height });

  app
    .data(fields)
    .append(arrow, {
      x: (d) => d.x * size + size / 2,
      y: (d) => d.y * size + size / 2,
      rotate: (d) => d.value,
      angle: cm.constant(Math.PI / 6),
      rotate: (d) => d.value,
      stroke: (d) => d.value,
      length: (d) => d.value,
    })
    .transform(cm.mapAttrs, {
      rotate: { range: [0, cm.TWO_PI] },
      length: { range: [size * 0.3, size * 0.9] },
      stroke: { interpolate: d3.interpolateViridis },
    });

  const node = app.render().node();

  display(node);
}
Modules
Charming’s kernel, as described in previous sections, proposes a flow-based rendering pipeline, consisting of the following core modules:
- App - rendering app to DOM and animating it
- Flow - binding data to shapes
- Shape - appending geometric elements to canvas, such as cm.circle
- Process - preparing data to be rendered, such as cm.each
- Transform - deriving shape attribute values, such as cm.mapAttrs
- Scale - mapping abstract data to visual representation, such as cm.scaleLog
The above modules will be bundled into the core module. Different renderers and related modules will be placed in the following separate modules:
- WebGL - WebGL renderer and related helpers
- Terminal - Terminal renderer and related helpers
For common problems, Charming provides a series of optional modules that encapsulate reusable solutions, increasing efficiency and alleviating the burden of common tasks.
- Array - array generation and manipulation, such as cm.range
- Math - processing numbers, randomness, such as cm.noise
- Constant - useful constants, such as cm.TWO_PI
- Vector - basics for simulating physical laws, such as cm.vec
- Helper - useful unities, such as cm.pathArray
Each modules have a thoughtfully designed interface, letting users plug in their own functions or objects for processors, transforms, shapes…even custom renderers.
Results
Throughout development, I have built numerous sketches with Charming, including some examples in The Nature of Code, demos in Observable, some of my previous sketches in OpenProcessing, etc,. These sketches involve different fields of computational art, such as particle systems, random functions, physics systems, visualization, and ASCII art, among others. For brevity, full source code is not included but is available online.
To determine if Charming is fully functional, I will assess its ability to implement these examples as intended. During this process, I’ll continuously adjust Charming’s API based on the development experience, until it meets the initial goals set. Next, let’s discuss the final results.
Declarative. Charming’s flow offers a declarative way of processing data and binding shapes to streamline the workflow, making the relationship between data and shapes more concise and understandable. This also separates the declaration of shapes from the rendering, allowing for different renderers to be used for the final rendering, thus improving rendering efficiency and enabling various visual styles.
High Performance. Render the effects mentioned in Instanced WebGL Circles in three different ways. While the Canvas renderer can maintain 60 FPS for up to 5.5k circles, the WebGL renderer can sustain the same 60 FPS for as many as 22k circles. Moreover, when faced with the task of rendering 100k circles, the WebGL renderer fails to draw them, but WebGL combined with GLSL attributes can still manage to render at a reduced frame rate of 10 FPS.
ASCII Art. By providing a terminal renderer and smoothing out differences in coordinate systems and colors, Charming allows you to use the same flow API to render ASCII art, such as drawing a bar chart in ASCII style.
{
  const data = [1.9, 1.9, 1.6, 1.0, 0.4, 0.1];

  // Dimensions.
  const step = 3;
  const marginX = 3;
  const marginY = 3;
  const plotWidth = 60;
  const plotHeight = step * data.length;
  const height = plotHeight + marginY * 2;
  const width = plotWidth + marginX * 2;

  const app = cm.app({
    renderer: await cm.terminal(),
    cols: width,
    rows: height,
  });

  // Bar Chart.
  app
    .append(cm.group, { x: marginX, y: marginY })
    .data(data)
    .append(barX, {
      x: (d) => d,
      y: (_, i) => i,
      step: cm.constant(step),
      width: cm.constant(plotWidth),
      height: cm.constant(plotHeight),
      title: cm.constant("Terminal Bar Chart"),
    });

  // Annotation.
  app.append(cm.text, {
    x: marginX + plotWidth,
    y: marginY + plotHeight,
    fontSize: "large",
    text: cm.figlet("2023"),
    textBaseline: "bottom",
    textAlign: "end",
    fill: cm.gradientSineBowX(),
  });

  const node = app.render().node();

  display(node);
}
Composable. In addition to simple composite shapes, Charming can also define complex shapes, for example, to define and use a barY shape to plot a bar chart. This greatly enhances the extensibility of Charming, making it easy to build its ecosystem.
{
  const app = cm.app({ width: 928, height: 500 });

  app.data(alphabet).append(barY, {
    x: (d) => d.letter,
    y: (d) => d.frequency,
  });

  const node = app.render().node();

  display(node);
}
Lightweight. Charming’ core bundle is just 25kb minified, while other features are exposed as helper modules and can be adopted incrementally.
Beginner Friendly. Although Charming provides some high-level abstractions and modules, such as flow, transform, and scale, beginners are not required to understand them at all. They can simply regard it as a collection of syntactic sugar for the Canvas API, with a conventional control flow. For example, to draw some random circles:
{
  const app = cm.app();
  for (let i = 0; i < 500; i++) {
    const x = cm.random(app.prop("width"));
    const y = cm.random(app.prop("height"));
    const radius = cm.randomInt(30);
    const r = cm.randomInt(255);
    const g = cm.randomInt(255);
    const b = cm.randomInt(255);
    app.append(cm.circle, {
      x,
      y,
      r: radius,
      fill: `rgb(${r}, ${g}, ${b})`,
    });
  }
  const node = app.render().node()
  display(node);
}
Future Work
Charming is still in testing and the APIs are not fully implemented and may not be stable.
Besides fully implementing the core APIs, I also want to develop a series of libraries related to Computational Art around Charming, to enrich the ecosystem of Charming:
- @charming-art/webgpu - A WebGPU renderer
- @charming-art/webxr - A WebXR renderer
- @charming-art/plot - A plot library for high performance
- @charming-art/image - An image processing module
- @charming-art/physics - A physics engine
- @charming-art/geometry - A collection of computational geometry algorithm
- …
These libraries share the same design API principles, engineering, and documentation structure as Charming. Some of them will be implemented in Rust and compiled to WASM to gain high performance, such as @charming/geometry, because I believe Rust is one of the trends in front-end development and a selling point for tools.
I also plan to initiate an education project based on Charming like Nina Lutz’ “A Year (2020) of (almost) Daily (code) Sketches” or Daniel Shiffman’s “The Coding Train”, leading creatives of diverse backgrounds to dissect the artistic features of algorithms, physics, and mathematics through this dynamic tool. After all, I think teaching is the most effective way of tool shaping.
Finally, my best hope with Charming is to become the D3.js of the Computational Art field!
// A composite barY shape.
function barY(
  flow,
  { x, y, fill = "steelblue", marginLeft = 40, marginTop = 30, marginRight = 0, marginBottom = 30, ...rest },
) {
  const app = flow.app();
  const [data] = flow.data();
  const width = app.prop("width");
  const height = app.prop("height");

  const scaleX = d3.scaleBand(Array.from(new Set(x)), [marginLeft, width - marginRight]).padding(0.1);

  const scaleY = d3.scaleLinear([0, d3.max(y)], [height - marginBottom, marginTop]);

  const I = d3.range(data.length);
  const X = x.map(scaleX);
  const Y = y.map(scaleY);

  flow.data(I).append(cm.rect, {
    x: (i) => X[i],
    y: (i) => Y[i],
    width: scaleX.bandwidth(),
    height: (i) => scaleY(0) - Y[i],
    fill,
    ...rest,
  });

  flow
    .datum(0)
    .append(cm.group, { x: 0, y: height - marginBottom })
    .call(axisX, { scale: scaleX });

  flow.datum(0).append(cm.group, { x: marginLeft, y: 0 }).call(axisY, { scale: scaleY });
}
function axisX(flow, { scale }) {
const range = scale.range();
const ticks = scale.domain();
const tickX = (d) => scale(d) + scale.bandwidth() / 2;
flow.append(cm.link, {
x: range[0],
y: 0,
x1: range[1],
y1: 0,
stroke: "#000",
});
flow.data(ticks).append(cm.link, {
x: tickX,
y: 0,
x1: tickX,
y1: 4,
stroke: "#000",
});
flow.data(ticks).append(cm.text, {
text: (d) => d,
x: tickX,
y: 6,
stroke: "#000",
textAlign: "center",
textBaseline: "top",
});
}function axisY(flow, { scale }) {
const range = scale.range();
const ticks = scale.ticks();
const tickY = (d) => scale(d);
flow.data(ticks).append(cm.link, {
x: 0,
y: tickY,
x1: -4,
y1: tickY,
stroke: "#000",
});
flow.data(ticks).append(cm.text, {
text: (d) => d,
x: -6,
y: tickY,
stroke: "#000",
textAlign: "end",
textBaseline: "middle",
});
}function barX(
flow,
{
x: X,
y: Y,
width,
height,
step,
title,
colors = ["#CC4A6A", "#6EBD41", "#D6B152", "#56ADD3", "#AC5ADA", "#7DDEBB"],
},
) {
const [data] = flow.data();
const scaleX = d3.scaleLinear([0, d3.max(X)], [0, width]).nice();
// Title.
flow.datum(0).append(cm.text, {
text: title,
x: width / 2,
y: -1,
textAlign: "center",
textBaseline: "bottom",
});
// Axis.
const axis = flow
.datum(0)
.append(cm.group, {
x: 0,
y: height,
})
.data(scaleX.ticks(5));
axis.append(cm.link, {
x: (d) => scaleX(d),
x1: (d) => scaleX(d),
y: 0,
y1: -height - 1,
stroke: cm.cfb(":"),
});
axis.datum(0).append(cm.link, {
x: 0,
x1: width,
y: 0,
y1: 0,
stroke: cm.cfb("-"),
});
axis.append(cm.text, {
text: (d) => (d ? d.toFixed(1) + "" : d),
textAlign: "center",
y: 1,
x: (d) => scaleX(d),
});
// Bars.
flow.data(data).append(cm.rect, {
x: scaleX(0),
y: Y.map((y) => y * step),
width: X.map(scaleX),
height: step - 1,
fill: (_, i) => cm.cfb("#", colors[i % colors.length]),
});
}